Rhombus Wrap

rhomboid box wrap

I thought I might make a box with unequal sides. And I just happened to have a stack of corrugated board rectangles just large enough to cover the gift.

I cut two sides of one rectangle. Then I proceeded to cut and match three more on their long edges, fixing them progressively with hot glue until I had a four-sided box with open ends.

I stood this construction on end to trace a end panel. Glued it on and did the same on the other end.

Wrapping the pale paper proved to be easier than I imagined it would be. The folding occurred on the small ends.

Then I added two contrasting ribbons, placing them on angles, in sympathy with the capricious shape of the box.

Foam Folly

yellow meat tray foam wrap

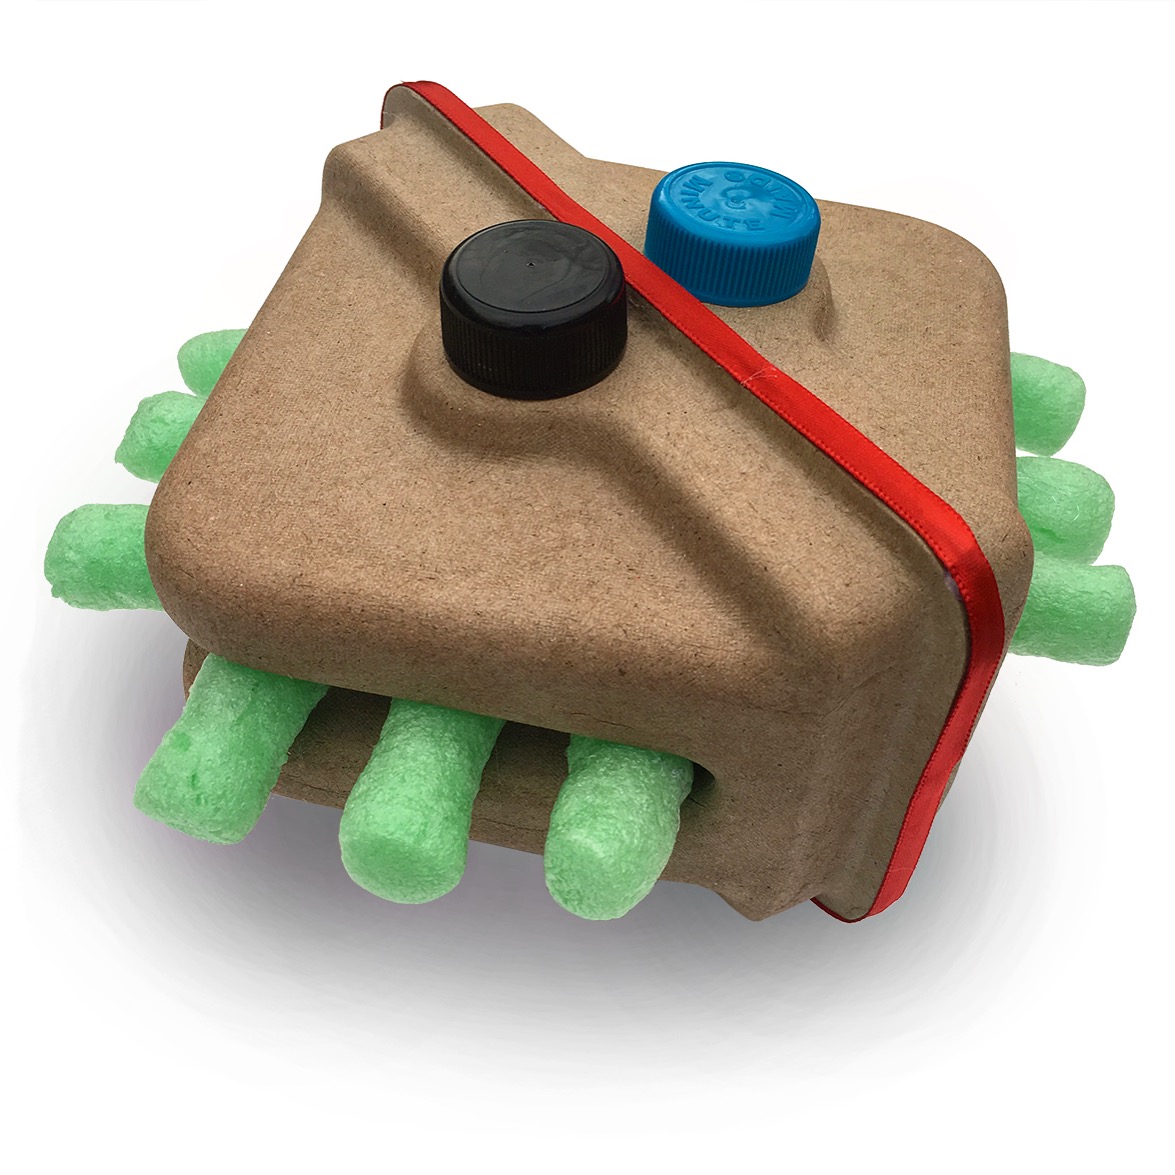
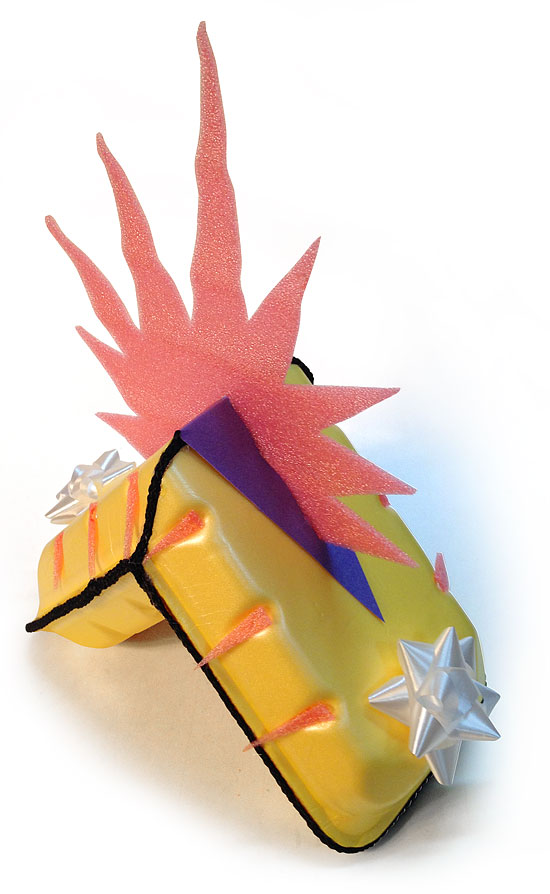
Continuing my fascination with packaging trash, and the malleable materials of the meat market, I offer your here yet another yellow-foam wrap. This time I decided follow another fancy of mine: disrupting the form with a 45 degree angle.

I drew lines on the two foam trays, then joined pairs from the four fragments with hot glue, to make two containers with 45 degree open faces. A bit of trimming was required to make them fit. Then I inserted the gift in one side, protecting it with some paper packing, and glued the two halves together.

The trays have words embossed in the middle of their now very-visible undersides. I thought a triangular form would make a useful addition to the design and would cover the words. I cut the long diamond shape from purple paper, folded it on the short axis, and glued it onto the foam box.

Next I glued black woven bag-handle cords along all the glue seams of the yellow box. And I added the two white bows, making risible reference to the traditions of quotidien wrapping.

But I could see it was not done yet. I thought it needed a crest or crown. I grabbed a piece or coral-colored packing foam and a scrap of white paper. I drew, cut and fit the sun-burst form in scrap paper, then traced it and cut it out of the foam. I glued it in place.

The little indentations that occur along the edge of the foam trays now called out for adornment. I cut little triangles of the coral foam scrap, and glued them in place. At last I had it, an exhuberantly odd wrap, ready for the parliament of packages under the tree.

Zen Table Wrap

zen table wrap

The wrap began as I rummaged through my wrap paper drawer and discovered an old type catalog, “X-Height.” It’s tall large page size, each page with a grid of square type samples, offered a paper suitable for small boxes, and one that was rich in non-repeating graphic forms.

I wrapped the present. However, the end folds did not quite cover each other, so I reached into the ribbon box, and retrieved a wide orange ribbon. I like to use ribbon on the small sides of a wrap; it provides more color and a texture change, but it leaves the stage empty for sculptural play.

Next I glued on four wine-cork legs. Raising a wrap on legs has an amusing and quietly transforming effect on any gift. The resonance with tables and benches lifts the wrap away from the metaphor of storage or inventory and places it into the non-wrap realm of furnishings.

At this point I did not have to place anything on this table.  The paper’s symbol-filled square were amply entertaining. But I was having fun, and began to play with the variety of wood and rock materials cluttering my studio. A pedestal of sample engineered bamboo felt good sitting on the type-sample wrap. I then tried numerous rocks and twigs until I finally settled on the flat gray “label” rock and its companion, a shiny black rock. I added the name of the recipient in white colored pencil, and glued all three pieces onto the table wrap.

Ribbon Wrap on Shopping Bag

One can start with a traditional form, and then add a slight variation which gives new visual snap. My base paper here is the shopping bag which took the gift home. I am using the inside of the bag’s paper, with images of fruits and flowers. I then proceeded to improvise with ribbon, using contrast of thick and thin ribbon, as well as contrast of light and dark, shiny and matte. I started with traditional ninety-degree ribbon placement. Then I began to look for the variation that would take the wrap a step past normal. I tried many ribbons placed at various places, but all at a forty five degree angle relative to the wraps edges. Finally I tried the black. Happy, I added another strip of silver cord adjacent to the black ribbon and then I was done. This was an easy wrap.

Florist-paper Wrap

floral paper wrap

When you buy cut flowers they come wrapped in durable, handsome paper. And the sheet is large enough to do some serious wrapping. This particular sheet appeared to be a form of plastic. It folded and creased in a pleasing fashion. After wrapping the gift I resorted to speedy and reliable ribbon-wrap tactics. First I made a yellow band of tissue paper, gluing it on the back. I then added two strips of a thin, shiny red ribbon to back a border stripe on the yellow band. The little red square is made of craft foam, placed at a 45 degree angle. I then completed the wrap with the transparent-weave blue ribbon (which had been cast off at an awards dinner by the medal winners, and retrieved, rolled up and removed for recycling by yours truly) running transverse to the band. I made this wrap quickly: no time for innovation. A house to be warmed; a dinner to be enjoyed.

Brochure Wrap

saguaro wrap

Marketing literature can deliver a lot when you are making a quick wrap. I had saved a large mailer with these tasty saguaro on it. The brochure was very large, so no words were revealed. After a bit of positioning and observation, I wrapped up the box rapidly. I added orange ribbon to complete the secondary color triad that was begun with the photo’s own purples and greens. And last of all I used a skinny piece of dark-green christmas ribbon. A delicious wrap in no time at all!

Chocolate-Packing Wrap with Melted Marbles

chocolate packing wrap

Open a box of chocolates and you find them arrayed in peculiar trays of thin molded plastic. The careful laborious detail and curious shapes of these moldings stand in stark contrast to their humble role as quietly supportive servants, doomed to be ignored and then trashed the moment the last chocolate has been been eaten.

But should you have one or more small gifts, a pair of these trays can have a reprise role as wrap.

At least that is what I thought in the aftermath of a tasty christmas. I joined the two trays with small pieces of two-sided tape, trapping the gift in small pieces of tissue. I then glued an orange shopping-bag handle around the edge; it sat easily in a groove made by the combined shapes of the trays’ edges.

Looking at the eight fluted pedestals of the inverted tray, it seemed obvious that they wanted something to perch on top. I had just received two bags of melted marbles. Their shiny surfaces seemed in sympathy with the shiny black plastic. I glued eight of the pale blue pebbles on the tops of the pedestals, and then added ten of the dark metallic ones — even closer in sympathy with the plastic, but different — around the pedestals’ bases. The dense glass pebbles contrast in mass with the ethereally thin plastic.

Berry Box Wrap

berry box wrap

Berry packers buy some of the loveliest pieces of throw-away plastic in our world. When these two identical blue boxes passed through our recycling bin, I immediately diverted them into the wrap stash. This is the second one of these blue berry box wraps I have done. The first used foam boxes. This is shiny plastic. But, like its predecessor, it too had indentations that would happily hold transverse ribbons.

I sealed this pair with strips of thin-cut masking tape. That way I could avoid gluing the boxes together and maybe used them again. I then glued a pale orange ribbon onto the masking-tape seal.

There is a rectangular depression in the bottom (now top) of the berry box. It has debossed type. I made this type disappear by cutting and attaching a rectangle of red shopping-bag paper with rounded corners. Then I attached four pieces of contrasting and skinny ribbons: smooth white satin and rough burlap stripe. I did some simple weaving as they crossed on top. Choosing which ribbon to use was the hardest part of the wrap.

The last detail was to attach a small plastic Christmas tree that I had found lying in a path in Washington Park a few weeks ago. Besides being charming and different this wrap is relatively water-proof and even sea-worthy in minor floods.

Yule Module

Yule Module

The idea for this wrap came to me just after awaking. I was thinking about slabs of black foam from meat-packing trays. They are easy to cut, thick enough to hold a lot of hot glue, and thus make good sculpture components to a wrap. I’ve used them before (Meat-Tray Fins on Red Bag Wrap).  This time the idea was to cut a slot into the slabs so that they made not only strange fins, but also legs to elevate the package.

Later in the day I wrapped the gift in a large piece of recycled wrapping paper. It’s silver & black houndstooth pattern had a mechnical quality and colors fully compatible with my industrial materials.

Cutting the foam trays involved a bit of guesswork. The trays are small enough that any attempt to make perfectly flat fins would produce relatively small pieces. So I decided to keep at least part of the trays’ rounded shoulders. I inserted my matte knife parallel the trays’ bottom plane, and carefully sliced with a reciprocating motion all the way around the tray. It worked pretty well giving me four round-cornered slabs which had gently-curving faces, resembling the back of an iPad, on one side of the slab.

I made a paper template in the shape of the slabs and then drew and tested the shape of the slot that would allow the fins to be slipped onto the package. It worked very well. Now I could play around with the placement of the fins. I had imagined at first that they would be aligned in parallel as in my first fin wrap. But I became intrigued when I discovered the stability conferred by a symmetrical X configuration.

Before gluing the fins I continued exploratory play looking for something that would sit in the small empty space at the center of the X. My favorite among various objects was an old standby of my recycling materials: a copper metallic plastic lid from an aerosol deodorant.

I used a drafting triangle to regulate the gluing process. Fat strips of hot glue attached the fins to the bottom side of the wrap. Holding the wrap carefully on my knees, I then added glue on the wrap-top backside of the fins. (This wrap is inherently stagey, having an inherent audience-vs-backstage assymetry.) I glued a cross-brace onto the deodorant lid, and then glued it to the center of the wrap.

I was not yet sure if I had a finished wrap. Poking around the bins I found a red lid from a cosmetic jar and glued it to the top of the copper-colored lid. That was it. The wrap was complete. It evoked a strong sense of abstract function. But what, exactly? It was the recipient of the gift who thought it looked like a space module. The wrap sits elevated off  floor, table or planet. It has a metallic palette. The curious cupola at its center is of ambiguous scale and purpose. Perhaps it is a big emergency button whose compression would set off a celebration.