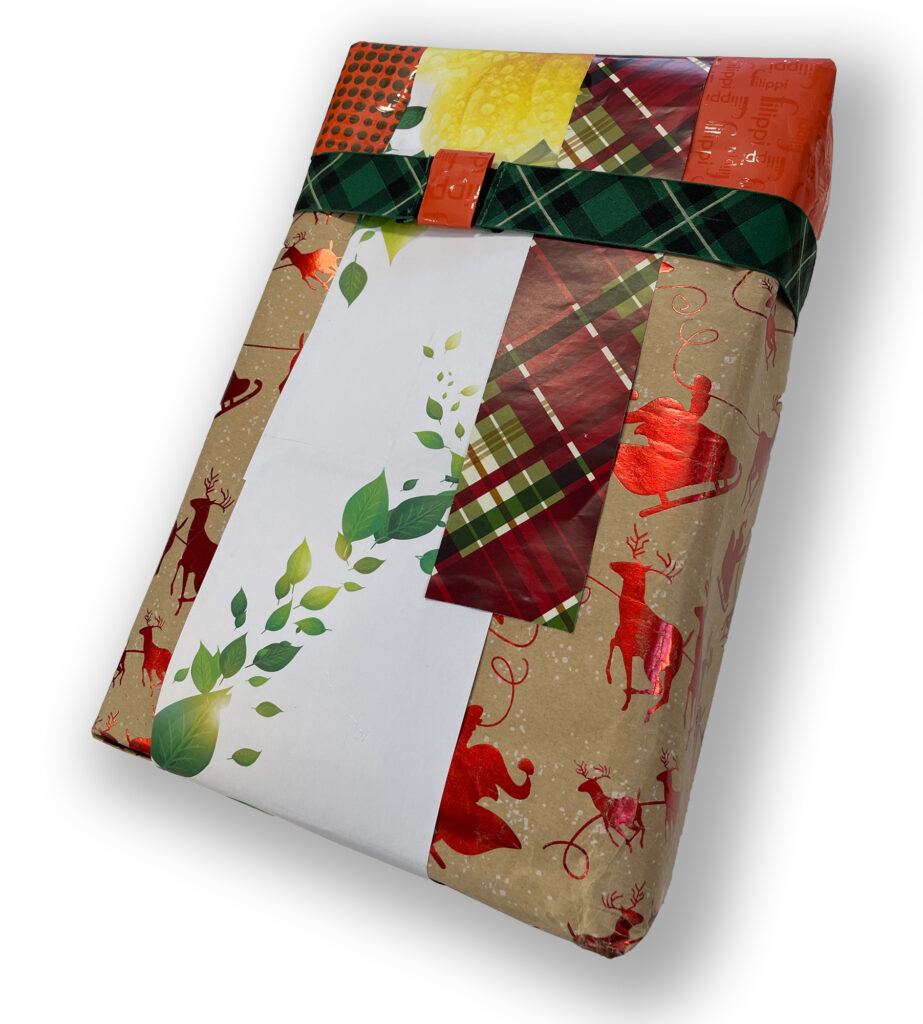
One of the most useful principles of scrap wrap is the “messy backstage.” There are six sides to a typical gift box: 1 back, 1 front, 2 end-folds, 2 plain sides. A wrapped present will normally rest on its back. That side is hidden from view. By permitting this area to be messy, we give the process of wrap improv greater freedom and speed. Scrap wraps are easier when you can hide anomalies of fit and finish on the back.
In this particular wrap, however, something funny happened. The messy backstage began to look more engaging the simpler front side. Four fragments of paper and an elastic ribbon join in a lively constructivist collage.
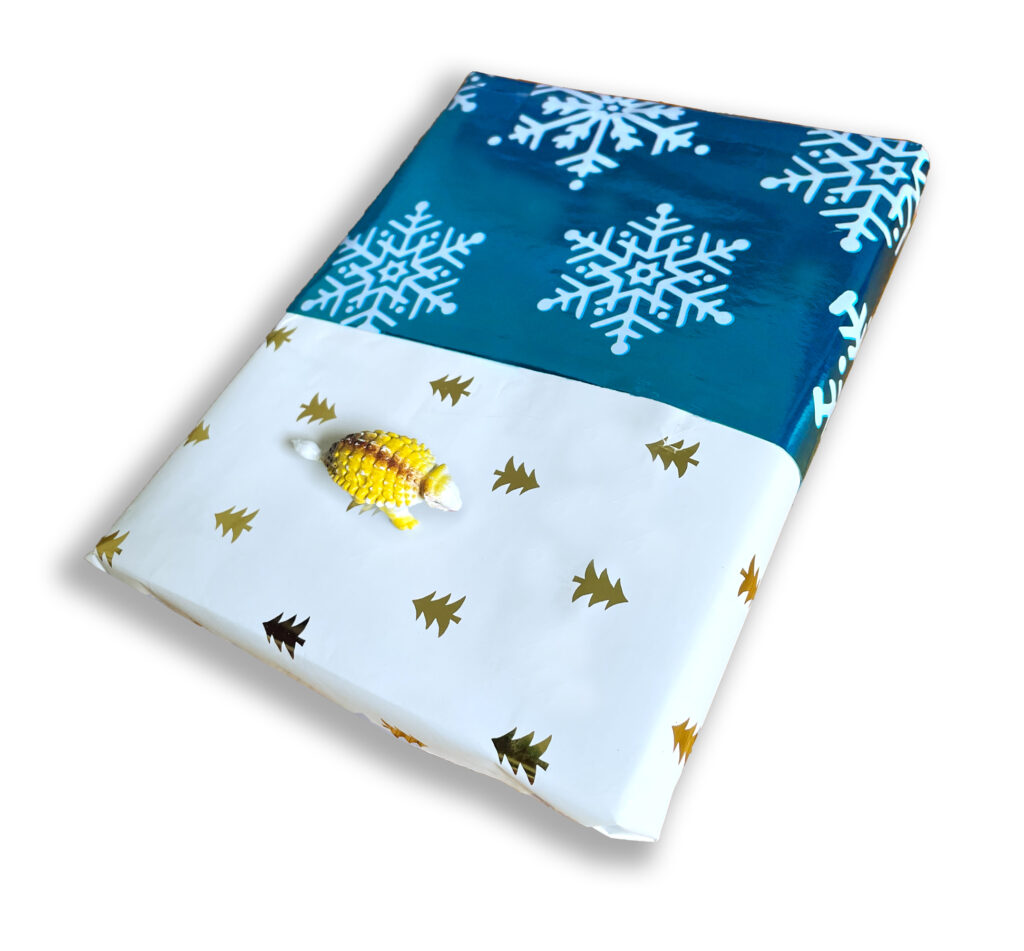
A very simple wrap for a very young recipient. Two foil paper fragments. Both use single-symbol graphic detail. But they contrast in brightness. One has a white background. The other is darker with blue. The mid-package join of the two papers is a simple folded edge. Foil papers are especially good at this. The finishing touch, its “bow,” is a small ankylosaurus toy, hot-glued onto the wrap.
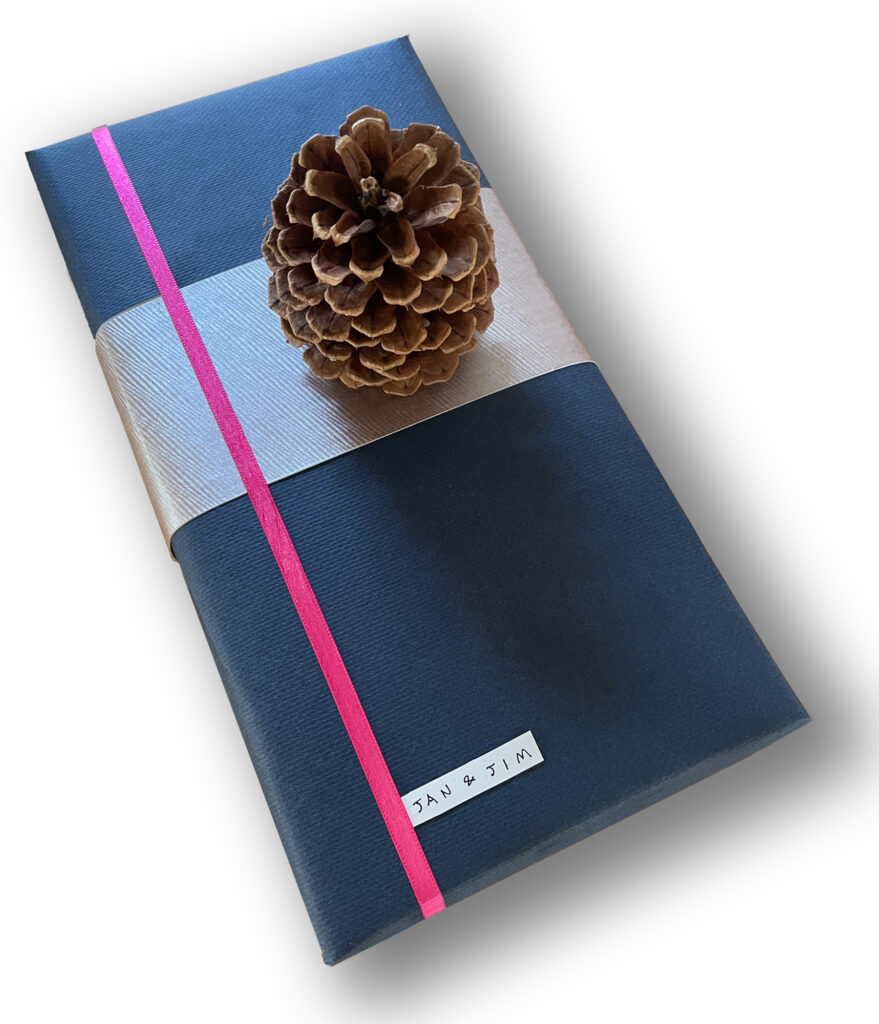
This wrap demonstrates the practicality of two-piece wrapping. I had two pieces of the blue paper. Neither piece was large enough to cover the present’s box. I wrapped the two pieces on either end of the gift’s box, with traditional folds on the ends. That left a raggedy unwrapped section in between the two blue sections. Following the protocol of two-piece wrapping, I covered that messy area with a wide band of thick silver paper. Its metallic texture contrasted nicely with the non-glossy texture of the blue paper. I positioned this band so that its lower edge aligned with the vertical middle of the gift box, creating a blue square on the bottom and a half-silver half-blue square on top..
I had planned that this wrap would feature a pine cone. I had just picked up four freshly fallen cones during a recent and very windy hike in the foothills. Before I glued the cone in place I studied the possibilities of placement for the magenta ribbon. I avoided centering it. Instead, I picked a location for the pine cone to right and then placed the ribbon centered between the cone and the left side of the package.
The last step was to make and place a tiny name tag for the recipients. They are custom shaped and made be an integral part of the design.
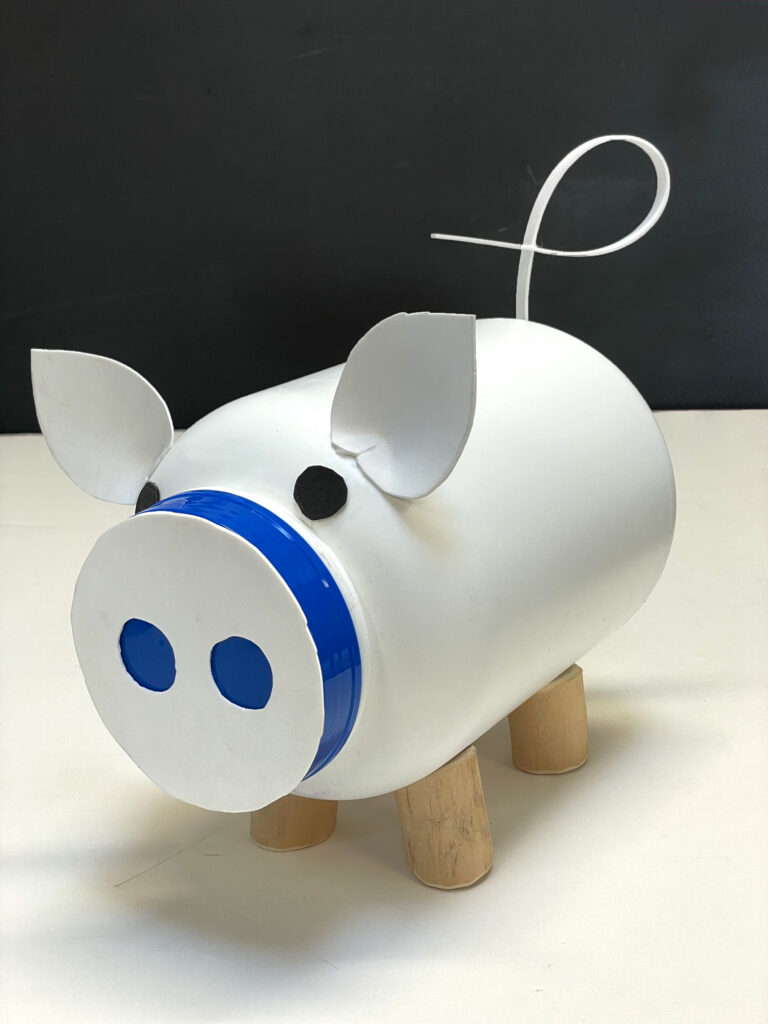
I had been thinking about this wrap in early November. I did not even know who would receive it let alone what gift would be placed in it. But I would imagine a pig whenever I laid the white plastic jug it on its side.
The first task was the hardest. I made four legs from a piece of a thin aspen that beavers had chewed down. I cut them with a saw and shaped them. Hot-glue attaches them to the white jug. Next came the snout. I used my circle cutter on white craft foam. I then referred to a test drawing and cut the two nostrils into the foam circle. I glued this onto the blue cap of the jar.
Next I made ears, using paper test models first to get the shape right. The bottom of the ears is a folded rectangle with a triangular cut out. That cut out permits an entire ear to curve ever so slightly as the two sides of the triangular cut-out meet during glueing. That bend-and-join makes the ears softly rounded and it also keeps the ear standing up. The eyes were simple: dots of black craft foam.
Last of all was the pig’s tail. I looked up pig images and found out that a single curl with one overlap was all most pigs had in their tails. No need for cork-screw spirals. A dot of glue held the curving tail in place as it crosses itself once. A tiny triangle of white foam placed where the tail attaches to the pig made the tail offset at an angle, offering good views from many viewpoints.
A few days before Christmas I thought of the gift that would agree with this novel scrap wrap. I had seen it on a shelf in my studio. It was an old beer bottle with a labels that I had designed a long time age for my geologist brother’s home brew: “Mud Lager.” The name plays off the oil drilling job of the person who logs drilling mud for its information: mud logger. The slogan: “When you’re having a blowout, don’t forget the mud logger.”
This wrap has the benefit of a screw-on cap. It can thus be used for a variety of occasions long after the gift has been given.
I have so many small boxes that I felt it would be a good idea to design wraps that used this surplus. The gift is in the largest box. It is wrapped with a page from a museum newsletter. The two added boxes are attached to the primary box. The littlest box, with a red foil surface and black angled stripes, serves two purposes. It is the name tag for the recipient. And it is a handle attached to the top white middle box. That white box has no wrap, and the offset of its lid is obvious. When you grab the black striped “handle” the white lid lifts off, revealing a curled white strip inside telling the recipient that the gift is inside the bg box. Silly, yes. But hopefully of some charm.
I had been cleaning up the wrap closet and discovered we have an inordinate number of shopping bags. I thought I would start using them as a wrapping-paper resource. The paper in these bags is a bit stiff compared to wrapping paper. So it calls for different tactics. In this case I added the silver floral paper first and gave it a nice angle. Then I picked up the red bag from Pasticceria Filippi’s awesome panettoni. As I held up the big slice of red bag against the gift box, trying various ways to place the papers, and considering whether or not to reveal the logotype, I came to notice the white bag handle. I decided I wanted to keep the handle on, and keep this utilitarian detail up-front. It was not to used as a handle, but rather to refer to concept of “shopping bag” even as the bag was being repurposed from transport to wrap. I hung a name tag on the handle and I was done.
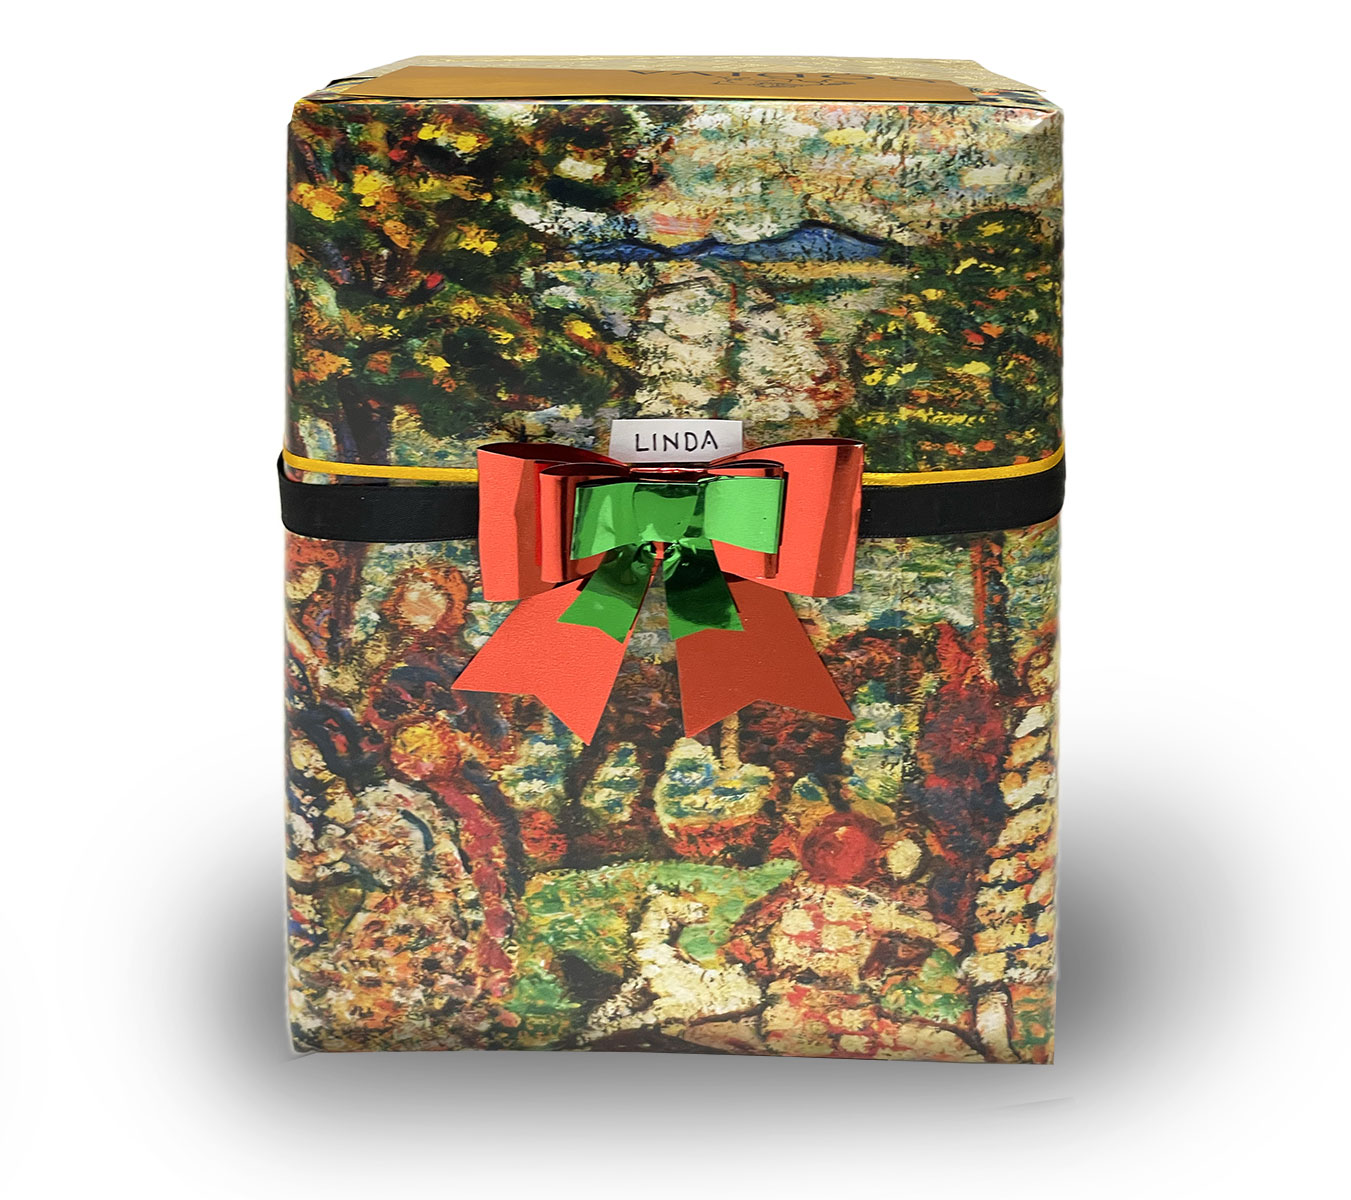
I had spent so much time on the “O Holo Wrap” that I needed to speed things up. Christmas Eve was fast approaching. This wrap is made of shopping-bag paper and a two-page foldout from the Denver Art Museum, a small oil painting from 1913 by Maurice Prendergast. To complete the wrap I added wide black ribbon and a thin yellow ribbon around the package. I finished with a red and green mylar bow and a tiny white recipient label. The out-of-view sides of the box continue with the images heavy impasto oil paint, some gold-foil wrapping-paper scraps and a couple of gold Godiva shopping-bag panels.
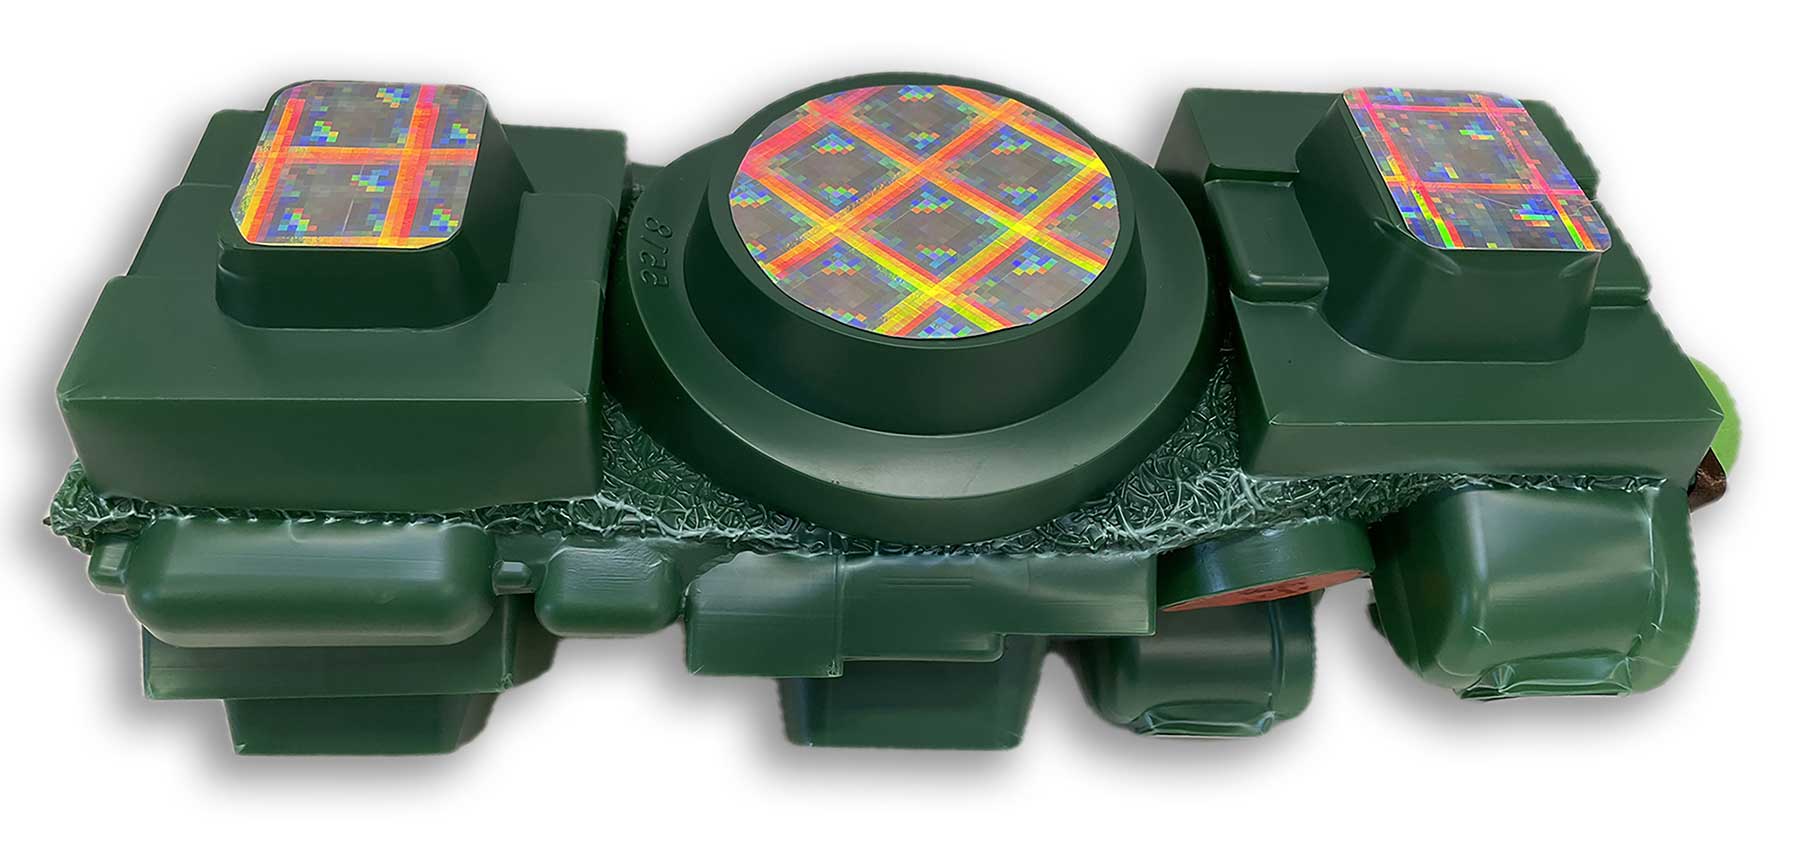
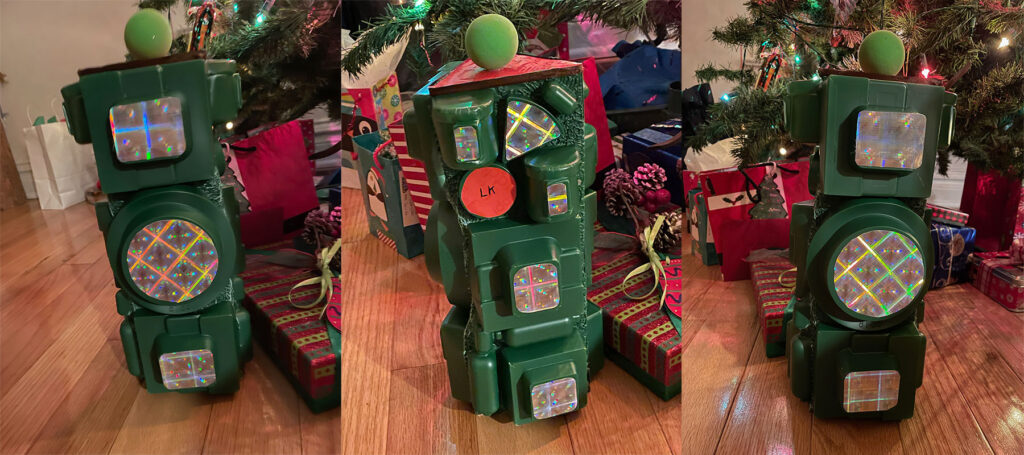
We had received a Christmas food gift from my brother & his wife. A green plastic tray held all the goodies in place in little pockets of vacuum molded soap. Playing with the intriguing topology of this object I discovered that it could be folded in thirds king a triangular column.
When I had the chance to turn into wrap art I tied it and hot-glued it closed, joining the outer edges of the three panels. I made triangular paper inserts out of stiff paper that fit into the top and bottom of the plastic box. I placed the gift inside and padded it with two foam scraps to preclude any motion motion of the gift.
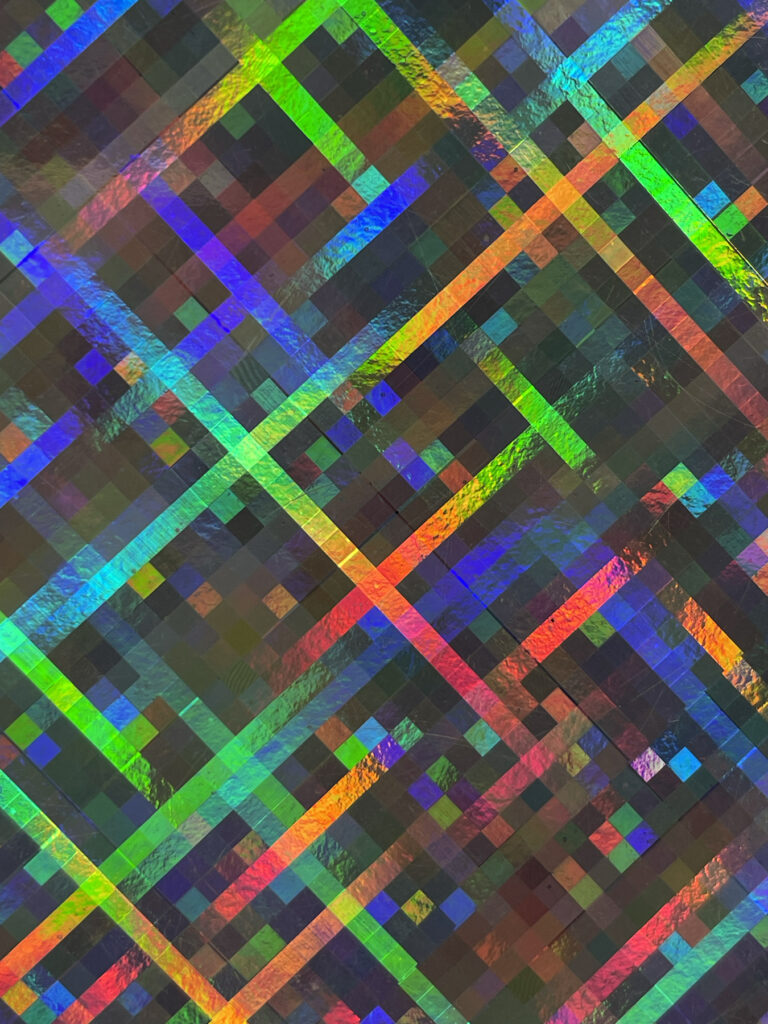
Now it was time to consider what to put on all the various flat platforms that arose from the three sides of the plastic form. I visited the ribbon closet and found a square cardboard envelope which had a holographic surface in a gridded pattern. When one views this materials from different angles, spectrum color shifts occur in the little squares of the paper’s pattern. There is almost constant animation. I began cutting squares, and triangles of this paper, fitting them on the various protrusions populating the green triangle-tube. Where cookies, chocolate, sausage, and cheese once lay in waiting, the container now popped out with these small dynamic color generators. To the eye they simulate little digital screens.
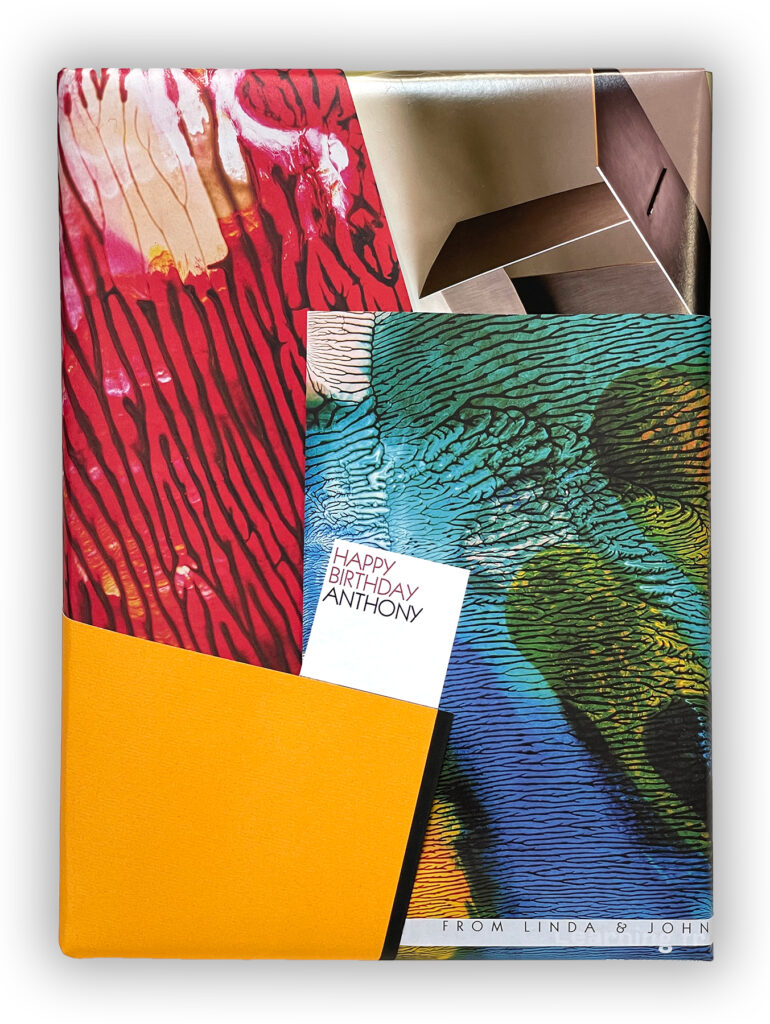
I had clipped some pages from issue 170 of the Yale Medicine Magazine recently, pages with lovely images that appeared to made by layering paints or inks and then laying other papers on top of that color and then lifting them up to create complex, organic-looking patterns. The results were great. After underwrapping the box I added the red page to the upper left corner, wrapping it around the corner. Then I added a photo from a design magazine in the upper right corner. Next I applied the green/blue page and wrapped it around the lower right corner. I added the yellow corner, the cover of a brochure I had designed for a client many years ago. It came with a thick black stripe. I made the gift label in Illustrator, cut it and glued it onto the wrap, aligning its right edge with the left edge of the black stripe.
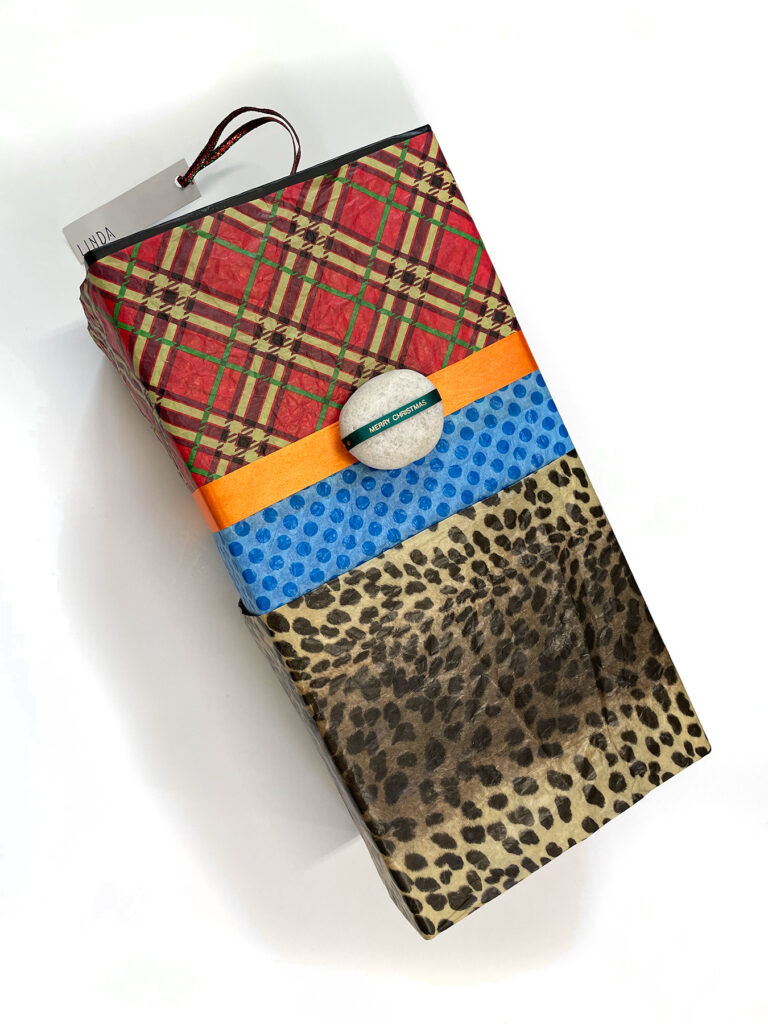
Time was running short on Christmas Eve, so I resorted to the most efficient of wrap art tactics: band wraps. You do not need paper big enough to cover the whole gift box. You just keep adding bands till you’ve got the look you like. Another element of speed in this particular instance, was that I had a beautiful black box with a fold-over lid with magnetic closure. So I did not have to wrap the ends; Three bands of folded tissue paper, with contrasting patterns and colors, are simply taped to the back of the box. I included numbers on the tape (masking tape with folded-over ends for easy pulling) to guide the recipient to an easy open. I then added a yellow ribbon to complete the wrap and give a better platform for the pale beach rock I had just decided to add to the mix. I wrapped a small piece of green Christmas ribbon around the rock and hot-glued the rock and ribbon to the yellow ribbon. If placed vertically, the rock-and-ribbon leaned a bit out and down, so I added tiny triangles of white foam underneath the rock, top and bottom, to reduce any motion.