Band Wrap on Yellow

The base of this wrap is a piece of marketing literature, a glossy yellow flyer with minimal type. It did not cover the whole gift, so I grabbed another sheet of paper. It had low contrast in color (dull diminished yellow) but high contrast in surface (no glass, uncoated, some texture).

Three of the bands were made from pages of a glossy newspaper supplement which features expensive watches and glamorous fashion. The fourth band is red recycled christmas wrap.

The label is hand-written right on the base wrap.

This wrap is a good example of elegance achieved in a quick and easy wrap.

For a tutorial on band wrap, click here.

Silver Shopping-bag Band Wrap

Shopping-bag paper is often a thick and luxurious substance. It can be hard to wrangle into submission. But the paper is so beautiful it is hard to resist whatever challenges it throws one’s way.

This particular bag had enough dings and wrinkles that it was not suitable for an outright one-piece wrap. The solution to overcoming it’s surface complexity was to create a wrap with an even-more complex surface. So I cut the bag  into strips and made folded-edge wrapping bands.

I did not want to wrap the ends with the thick paper, so I selected a blue tissue paper and capped the ends. Then I added successive silver bands to wrap the gift. I was aware of the white Optima letters from the bag’s logotype, making them into decorative trim, taking advantage of Hermann Zapf’s beautiful curves.

I finished the wrap with a silver cap-bow.

This is my first band wrap using one-color bands. The finished effect reminds me of the titanium-paneled building surfaces of Frank Ghery and Daniel libeskind.

Cross Bands on Blue Mylar

Reining in my proclivity for innovative wraps and cleaving toward the practical in the waning hours before Christmas, I made this little wrap.

It brings together two scraps I wanted to use. The first was a piece of foil wrapping paper with Santa Claus medallions. I made one wide band, folded its edges to make a ribbon-like band. I cut it into three pieces: two for a criss-cross ribbon and one little piece to roll into the “bow.”

Rifling through my wrap scrap drawer I had come across a sheet of thin blue mylar with holographic swirls built into it. I had already used it to make a toy-car wrap. Now these two papers, Santas and the blue mylar, while both reflective, were different in their visual detail, and made such a good team.

I wrapped the box in the blue, taped on the ribbon bands, and had a great wrap in the traditional cross style.

Dark Bands

Band-wrap collage produces improvised designs of rewarding complexity. While I do permit myself some level of choice in the printed materials I cut into strips to make the bands, I do not linger long on those choices. At this time of year I wrap faster and faster.

Thus the process of making band wraps allows me to become a captive viewer, as I feverishly pursue my craft, of the new hitherto unseen visual improvisation that is occurring in my studio.

Recycled-shopping-bag Band Wrap

I thought I might veer away from my recent fascination with discarded packaging materials and return to wrapping with paper.

Shopping bags offer some of the most amazing paper around, and it often gets discarded. I get some of my best ones from my alley dumpster. I took a red one from our supply and cut it apart apart to wrap the thin box pf this gift.

One half of the bag covered the gift. I sealed it on the back with hot glue. I then sealed both ends without trying to bend or fold the stiff paper. I snipped those glued ends to give them a precise and common edge. Then I folded them over onto the bag and glued them down.

Of course, rendered shopping bags do have their surface flaws. At this point in the wrap I had a major retailer’s elegant type crossing my wrap. Parallel to that was a crease from the lower edge of the bag. And last of all I had a neat round hole left over from the bag-handle strings.

So, I cut strips of red paper from the remaining bag fragment, and folded their edges over to make puffy wrapper’s bands. I cover the typography and the crease with two horizontal bands, gluing them to the back. I cover the bag handle hole at the top of the wrap with the third band. I placed it at an angle to make the wrap more dynamic.

I spent a bit of time looking for ribbons to add some complexity to the texture of the wrap. I settled on two pieces, a dark green horizontal to fulfill the Christmas color dyad, and then a red ribbon with a darker red velvet center and white dashes along the edge.

I labelled it freehand using a black marker.

Band Wrap Combines with Two-piece Wrap

jandr


This is the second of Jacob and Rachel’s wraps. I began this wrap as a two-piece wrap. The gold-polka-dot paper had just arrived on a wrapped calendar. But it was to be the second layer of the two-piece technique. I chose the black shiny paper of shopping back as the foundation.

The bag had a white logotype printed on its sides. The vertical lines of its extremely condensed type suggested using the vertical lines of the band wrapping to cover up the logotype; if some of the white lines showed through they would become part of the band design.

First I made a temporary placement of the gold paper so I would know the angle of the edge where two pieces join. Then I wrapped the thick black paper onto the top half of the gift.

The bands went on next, thins strips with soft, puffy folds along their edges.  I left plenty of black paper to the left and right of the bands, which were now looking like a kind of “bow” in the evolving composition. I placed and fixed the gold polka-dot paper. At this point the bands became more of a flower arrangement sitting in the vase of gold paper.

The basic wrap was in place but the wrap was still not complete. I experimented with various kinds of ribbon, placing them in sympathy with the angles of the wrap, but crossing on top of all the wrapping components. As I analyzed the way the dimensional bands tucked into and under the round folded edge of the gold paper, it seemed a good idea to make the ribbon both cross over the two-piece border and also tuck under the bands, ironically enhancing the illusionistic space of this flat design by real dimensional means.

I was getting close to completion. I had wanted some gauze ribbon in the system. I took a red piece and glued it so that it tucked into the  two-piece border, and then ran down parallel to the black-and-white ribbon. I took one of my computer printed labels, cut it into a strip and placed in tuck-under style adjacent to the red gauze ribbon. Now the wrap was finished, a lively constructivist design with a very dimensional feel and plenty of reference to traditional wrapping’s luxury textures.

Band Wrap for a Wedding Gift

jandr-b


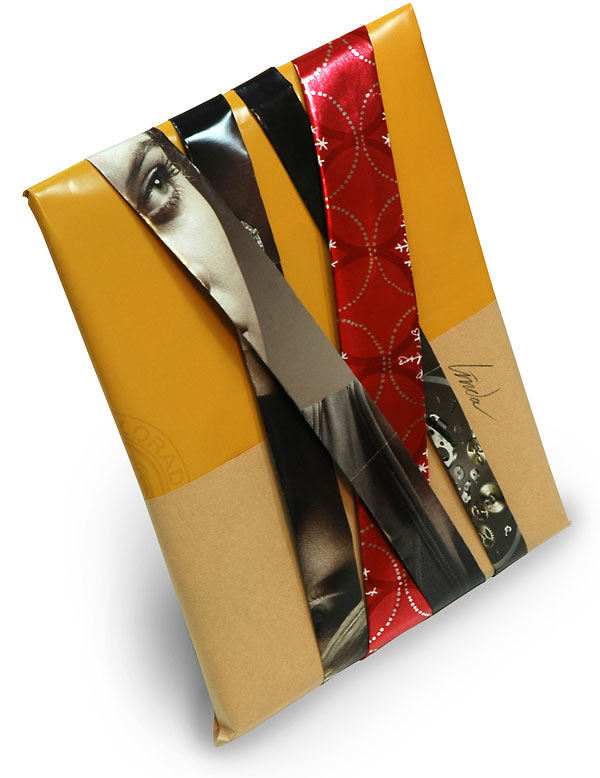
This is one of two wraps for Rachel and Jacob.  The gift has curved edges on the short ends, and it is solid enough to wrap without a box. I gave it a quick white-paper wrap, and it turned out that the white paper was almost exactly the same width as the long edge. That meant that there was minimal paper overage for making properly folded and taped ends. But typically-folded ends would have been a wrinkly mess on the curves. Freed from that problem by the paper’s width, I was still left me with the challenge of covering the curved ends.

I decided on applying an edge-wrap of ribbon, choosing a shiny, patterned white ribbon for it’s wedding-dress feel. I put the ribbon aside for later application, and moved on to main wrapping tactics.

I disassembled a magazine and some mailers and made a bunch of printed bands, each with two folds, which gives my wrapping bands their slightly pneumatic shape and softened edges. One of the bands is folded tissue.

This gift was large enough that typical pages of magazines are too shorti. I had to use the wide paper of the folded-poster mailers for most of the bands. When those ran out I began to glue regular magazine page bands together, hiding the join by the way I positioned the band under a previously-positioned band.

Laying out the bands is an improvisational exercise. One after another, starting closer to the center, you keep on adding new bands. A bit of weaving is involved. Eventually you begin to see a satisfying arrangement, and that is when you should start to think about stopping.

Once the band wrapping was done it was time to glue the ribbon all the way around the edge, covering up the end wraps.

I printed out a label, and snugged it behind two bands.

Magazine-page Woven Band-wrap

band-weave-104Wrapping with bands is a great way to take advantage of our print-rich environment. I take magazine pages and cut them into long  strips, 2″-5″ wide. Fold the two long edges over. This gives both the edges and the whole band a softened and rounded look, a pillow effect.

I glue or tape the bands on the backside and wrap them around. In this case I also chose to weave them. The procedure consists of gluing bands along one short and one long edge of the box. The weave begins at the only corner where these glued bands meet. Alternating between short side and long side, you wrap the bands around and affix them to the back, weaving the bands as you go.

For as tutorial on making the bands, go to this page in the Wrap Art Gallery.