Foam Tray Tinsel Fur

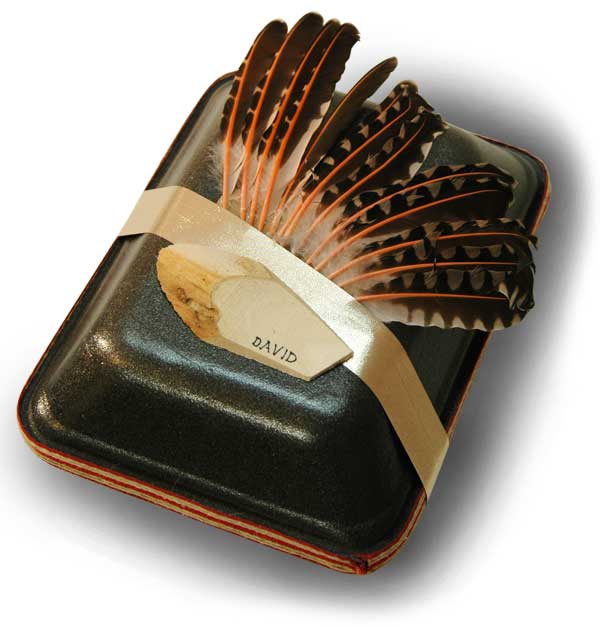
The foam trays of meat packaging have a subtle beauty that emerges once they have been gussied up enough to obliterate their low-caste role in our lives. In this case I have taken the gussying process so far that you can barely see that beauty as the trim takes over.

The first step in foam-tray wrap is easy. Place the gift in a try, just as the butcher places the sausages. Apply little strips of glue along the top of the long edges (the short edges do not actually touch when two trays are placed together) and then apply the second tray face down. Hold to permit the glue to set. Alternately, you can tape the edges, if you plan to cover them with some trim.

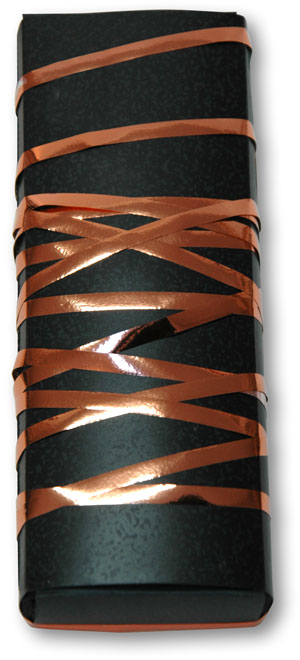
For this wrap I had thought I would just run the blue-silver tinsel boa around the edge, my standard technique for transforming the two trays. When the paired edges of the trays disappear, the sow’s ear begins its transformation to silk purse. That change is completed by obliterating the debossed type (manufacterer and recycling info) on the underside of the tray.

Contemplating the wrap thus far, I decided against adding some new contrasting material and began a new round of the same tinsel boa on the shoulder of the tray, feeding the furry forest I saw along the edge. Then I added the silver bow over the debossed type. It becomes the central shrub in this new landscpe.

Some of the beautiful shiny black foam shows through. It is usually a central element of my foam-tray wraps. But here it becomes a subservient but sympathetic dark background to the complex light/dark texture of the mylar tinsel. It’s quite a transformation, from trash to tiara. This gift has a very eager, lively feel. It asks to pick it up and play with it.

Purse Wrap

It’s always fun to make wraps that look like real things in the world. But the wrap story on this piece, and this purse, is improvisation. Improvisation is, of course, the heart and soul of Wrap Art. The wrap artist arrives at the moment of wrapping with little or no vision of what the wraps will look like. There is no burden of program or planning, just a time of pure play.

I began this wrap by taking the gift, a small garment, and rolling it up. I had no small boxes at the service office where we were wrapping. So I picked up a scrap of cardboard and molded it around the gift. It made odd shapes as the cardboard corrugation began folding. I wondered if I could find a real box somewhere, but the voice of improvisation said, “No. Keep on inventing with this cardboard!” Finally I had a nice shape, square on one side, but rounded on the other. I taped it shut.

Next I grabbed a beautiful shopping bag which was made of very thick red paper with silver foil-stamp snowflakes. I chose it purely for its material beauty. I still had no idea where this wrap was going. After removing its silver handles, and slicing it into flat paper, I wrapped it around the cardboard package. Using scissors, I made multiple cuts into the part of the red paper extending past the cardboard inner container. The round top required multiple cuts to maintain the curve that gives the wrap its purse shape. Then I folded the ends and glued them shut.

I had been thinking about what this wrap might be thematically: abstract or literal, and I began to imagine another animal wrap, with legs and antlers. But these thoughts were vague. Just then Jennifer, who had told me of this volunteering opportunity last year, looked over from her wrapping and said, “It’s a purse!” I grabbed the silver bag handles, clipped off their knotted ends, and glued them in place. I used some snippets of silver ribbon to clean up the ends and suggest the leather techniques of real purses. And I was done.

No real planning. Just openness to the materials and feedback from all directions.

Yale Service Group Wrapping at Florence Crittenton High School

This is my second year wrapping presents for Florence Crittenton High School. It’s a part of Denver Public Schools, serving teen moms. Florence Crittenton  Services does a great job of fundraising and acquiring specific gifts for specific moms. Volunteers spend a fun evening wrapping them up. I encourage the Colorado Yale Association’s Service Group to join the party.

These are the wraps I made for the Christmas of one young woman and her child.

I did a Band Wrap, an Enhancement of a Pink Box, two Black-foam Sausage Tray Wraps, a Cow Wrap, an Elk Wrap, and last but not least a Purse Wrap. I will detail some of these in later posts.

Yard Sign Recycling

Can political advertising be converted into a charming holiday wrap? I just had to try.

I was in New Haven in November and kept seeing posters for Linda McMahon’s run for a senate seat. Being married to a Linda, I enjoyed the politician’s aggressive one-name branding effort, which featured a big “Linda.” I never did manage to get even a photo of her graphics, but a friend in Connecticut, amused by seeing my wife’s name all over his community, sent me one of McMahon’s yard-sign sleeves.

I trimmed it along the three closed edges, making it into two large sheets of plastic. I then angled wrapped one of them over my Linda’s Christmas present, using tape. Then I proceeded to make folded-edge rectangles of used wrapping paper to cover up the exposed areas of underlying box.

If not quite a conversion to gold, my alchemy has at least turned base plastic into something amusing.

45-degree Wrap

Foil paper is a joy to wrap. It folds so effortlessly. I made four panels using two kinds of holiday paper, one a light gold with words, and the other a darker red with snow flakes: contrast of color, plus contrast of symbols (image vs. alphanumeric). I wrapped under the edges of the paper, creating puffy effects similar to the wrapping bands I often use.

Before applying the panels, I made a small golden square by cutting a piece of foam and gluing on a strip of ribbon. I placed this in the center of the gift box at a 45 degree angle. This is the seed crystal of the wrap.

Next I began hot-gluing on the four panels. Once again, I ignore what happens on the backside; I just get the back wraps flat, however messy.

Then I chose two kinds of ribbon: silver to go on the red, and red to go on the gold. I glued them by their ends. They are positioned one unit (defined by the central square’s widh) away from the central square.

This is not the easiest or quickest wrap. It does allow you maximize favorites scraps you have saved. And the ribbon technique could be used to expand the design even further than I have gone here.

Cross Band Wrap in Recycled Florist’s Papers

All three papers in this wrap came from the purchase of cut flowers. The yellow and green material is some kind of thin felted fiber.

After wrapping the box with the white and purple vine paper, I began folding the yellow paper over onto itself, making it into a ribbon-like wrapping band. The paper had slices and tears in it from the way the florists cut it to embrace the cut flowers. So I had to use little pieces of transparent tape to stabilize it during folding.

The green paper is actually two fragments joined by tape. The tape join was hidden by sliding the green band under the yellow.

I chose the offset positioning of the bands to add a dash of asymmetry to what is ultimately a very traditional wrap. And then I made a quick drawing of the recipient’s initials; I cut that design out of black paper. I fastened it with rolled tape to the yellow band, positioning it uphill from the bands’  intersection.

This wrap represents the enrollment of typical throw-away materials into an easy interpretation of traditional wrapping.

Recycled Packaging

I had saved an appealing plastic box that once held a new pen.  It was a sleeve, patterned and textured, which held a two-piece black foam container. Too beautiful to throw away.

There is a burden to saving beautiful packaging. It can consume space. Caution is advised. But the payoff comes when you have just the right thing for a quick wrap.

All I had to do here, after inserting the gift, was to wind some ribbon around the box. In this instance I used a shiny copper mylar ribbon. I wrapped in a purposely irregular fashion. The criss crossing providing a casual contrast to the very polished, dark, industrial materials.

The end result was a handsome small package with a sophisticated feel.

Ribbon Tease

Some boxes are so beautiful that it is a shame to cover them up. Combine that with a desire to tip your hand on the celebratory contents of the gift, and you have a chance for a very quick but lovely wrap. One piece of red and green ribbon (with gold trim) was all it took for this wrap.

Alternately, if you have a gift that will trump the expectation of good Champagne, you can use these amazing boxes to wrap something entirely different. This worthy yellow brand provides boxes that have a big drawer that slides smoothly open.

(Yes, I’m still reviewing this past Christmas’ wraps.)

Facebox

When I ran out of tube-shaped boxes to wrap a bunch of gift beers, I placed the last one in a smallish FedEx box and reached for a large piece of brown wrapping paper. This paper was salvaged from an exceptionally large shopping-bag from a franchise bakery’s catering service.

Once I saw that the orange band split the face of the package in half, I decided to run with the idea of a face. I took some scraps from black meat-tray foam and cut them into the pieces you see here.

I reached into my box of plastic bottle/carton caps and took two black caps for the eyes.

I sliced up a white food-take-out box to get the foam for the hair and teeth. The hair piece had an angle already molded into it, that would make it easy to glue on top of the wrap. I simply cut the overall rectangle shape and then sliced out the gaps to make the hair. The teeth were made from the scraps.

I tried a variety of ways of depicting the mouth, including two rows of teeth, and curved top and bottom borders for the teeth. But that greater realistic detail destroyed the iconic power of the four abstract teeth.

I would like to sing the praises of food-packing foam. It is an incredibly easy medium with which to sculpt shapes. It is too flimsy to be enduring in regular art objects; but that is not a problem in the highly-transient forms of wrap art. I cut it with a matte knife. Many cutters will work.

I enjoyed this mask-like design. It was second face wrap I did this season. The faces reach out strongly in a community of wrapped gifts.

Feathers on Foam

I was giving a present to a young man who likes animals and nature, so I decided to work with the contrast between natural materials and industrial materials.

I glued the gift inside two black foam meat-packing trays. I glued some thick cloth ribbon around the edge where the two trays join.

The fan of woodpecker feathers was actually salvaged from a wrap I executed a number of years ago. It was lying in the bottom of a box a miscellaneous wrapping resources.

An angled strip of gold ribbon added a flashy reference to traditional ribbon. It also has a shiny quality similar to the black foam itself; that commonality helps transform the foam from trash to lovely new material.

Lastly, I reached into my box of aspen scraps left over from sculptural work. I wrote the recipient’s name on a chip and glued it onto the wrap.

The result is a wrap with a richness of materials and texture, almost all of them unexpected in wrapping, but with a very warm effect.