Ankylosaurus Wrap

A very simple wrap for a very young recipient. Two foil paper fragments. Both use single-symbol graphic detail. But they contrast in brightness. One has a white background. The other is darker with blue. The mid-package join of the two papers is a simple folded edge. Foil papers are especially good at this. The finishing touch, its “bow,” is a small ankylosaurus toy, hot-glued onto the wrap.

Asymmetrical Pinecone

This wrap demonstrates the practicality of two-piece wrapping. I had two pieces of the blue paper. Neither piece was large enough to cover the present’s box. I wrapped the two pieces on either end of the gift’s box, with traditional folds on the ends. That left a raggedy unwrapped section in between the two blue sections. Following the protocol of two-piece wrapping, I covered that messy area with a wide band of thick silver paper. Its metallic texture contrasted nicely with the non-glossy texture of the blue paper. I positioned this band so that its lower edge aligned with the vertical middle of the gift box, creating a blue square on the bottom and a half-silver half-blue square on top..

I had planned that this wrap would feature a pine cone. I had just picked up four freshly fallen cones during a recent and very windy hike in the foothills. Before I glued the cone in place I studied the possibilities of placement for the magenta ribbon. I avoided centering it. Instead, I picked a location for the pine cone to right and then placed the ribbon centered between the cone and the left side of the package. 

The last step was to make and place a tiny name tag for the recipients. They are custom shaped and made be an integral part of the design.

Pig Jar

I had been thinking about this wrap in early November. I did not even know who would receive it let alone what gift would be placed in it. But I would imagine a pig whenever I laid the white plastic jug it on its side.

The first task was the hardest. I made four legs from a piece of a thin aspen that beavers had chewed down. I cut them with a saw and shaped them. Hot-glue attaches them to the white jug. Next came the snout. I used my circle cutter on white craft foam. I then referred to a test drawing and cut the two nostrils into the foam circle. I glued this onto the blue cap of the jar.

Next I made ears, using paper test models first to get the shape right. The bottom of the ears is a folded rectangle with a triangular cut out. That cut out permits an entire ear to curve ever so slightly as the two sides of the triangular cut-out meet during glueing. That bend-and-join makes the ears softly rounded and it also keeps the ear standing up. The eyes were simple: dots of black craft foam.

Last of all was the pig’s tail. I looked up pig images and found out that a single curl with one overlap was all most pigs had in their tails. No need for cork-screw spirals. A dot of glue held the curving tail in place as it crosses itself once. A tiny triangle of white foam placed where the tail attaches to the pig made the tail offset at an angle, offering good views from many viewpoints.

A few days before Christmas I thought of the gift that would agree with this novel scrap wrap. I had seen it on a shelf in my studio. It was an old beer bottle with a labels that I had designed a long time age for my geologist brother’s home brew: “Mud Lager.” The name plays off the oil drilling job of the person who logs drilling mud for its information: mud logger. The slogan: “When you’re having a blowout, don’t forget the mud logger.”

This wrap has the benefit of a screw-on cap. It can thus be used for a variety of occasions long after the gift has been given.

O Holo Wrap

We had received a Christmas food gift from my brother & his wife. A green plastic tray held all the goodies in place in little pockets of vacuum molded soap. Playing with the intriguing topology of this object I discovered that it could be folded in thirds king a triangular column.

When I had the chance to turn into wrap art I tied it and hot-glued it closed, joining the outer edges of the three panels. I made triangular paper inserts out of stiff paper that fit into the top and bottom of the plastic box. I placed the gift inside and padded it with two foam scraps to preclude any motion motion of the gift.

Now it was time to consider what to put on all the various flat platforms that arose from the three sides of the plastic form. I visited the ribbon closet and found a square cardboard envelope which had a holographic surface in a gridded pattern. When one views this materials from different angles, spectrum color shifts occur in the little squares of the paper’s pattern. There is almost constant animation. I began cutting squares, and triangles of this paper, fitting them on the various protrusions populating the green triangle-tube. Where cookies, chocolate, sausage, and cheese once lay in waiting, the container now popped out with these small dynamic color generators. To the eye they simulate little digital screens.

CLICK HERE FOR A VIDEO OF HOLO WRAP

I finished the wrap with a colored paper triangle on top, a brown ribbon around its border, and an all-purpose green ball on top.

Tissue Band Wrap with Beach Stone

Time was running short on Christmas Eve, so I resorted to the most efficient of wrap art tactics: band wraps. You do not need paper big enough to cover the whole gift box. You just keep adding bands till you’ve got the look you like. Another element of speed in this particular instance, was that I had a beautiful black box with a fold-over lid with magnetic closure. So I did not have to wrap the ends; Three bands of folded tissue paper, with contrasting patterns and colors, are simply taped to the back of the box. I included numbers on the tape (masking tape with folded-over ends for easy pulling) to guide the recipient to an easy open. I then added a yellow ribbon to complete the wrap and give a better platform for the pale beach rock I had just decided to add to the mix. I wrapped a small piece of green Christmas ribbon around the rock and hot-glued the rock and ribbon to the yellow ribbon. If placed vertically, the rock-and-ribbon leaned a bit out and down, so I added tiny triangles of white foam underneath the rock, top and bottom, to reduce any motion.

Old Leaf

wrap art with autumn leaves

I love the dried leaves that carpet the autumn pathways. I began preparing for this wrap a while ago. And I added new leaves right up to the day I made this wrap. I have used large green leaves in the past. They can be shaped to the package. But what would allow me to use brittle dried leaves. I decided that I would try foam stilts to lift them free of the underlying wrapped box. I cut short pieces of white foam and hot-glued them onto individual leaves. When they cooled and were stable I trimmed the bottoms to make them stable and free-standing with three legs. Then I glued them onto the white-wrapped gift box. I added some that had only two legs, raising them higher that the initial batch of leaves so that the collage had a feeling of being airborne. Eventually there were enough to call it a finished composition.

Merry Astro Turf

The plastic turf fragments turned up this summer in my ever productive alley. I had been waiting for them to have a purpose. Last week their first mission became obvious: turf wrap. It is green (half of the seasons branding colors). It is unexpected. It is inherently silly.

It is also hard to cut. But I persisted and got my rectangle for the lid of this gift’s shipping box. I covered the box with the brown-dot paper in such a way that the lid can still be opened. No need to rip up the wrap. One piece of paper covered three sides of the box. And a fourth piece I glued on the flap of the lid. Next the astro turf went on top. I chose a red ribbon with the gold trim; it provides that sense of traditional wrapping aesthetics. And of course red is the second seasonal brand color not to mention the complementary color of green.

I had been testing the shiny red ball all along as a component to complete the grass box top. While searching for another shiny object I found the golf ball. I paused for a bit, resisting the natural symbolic affinity of ball and grass. I finally gave in and placed it in the composition. Then it occurred to me that the red ball would gently confuse the reference to golf by hinting at “snowman.” I added the label and was done!

Twig Bower

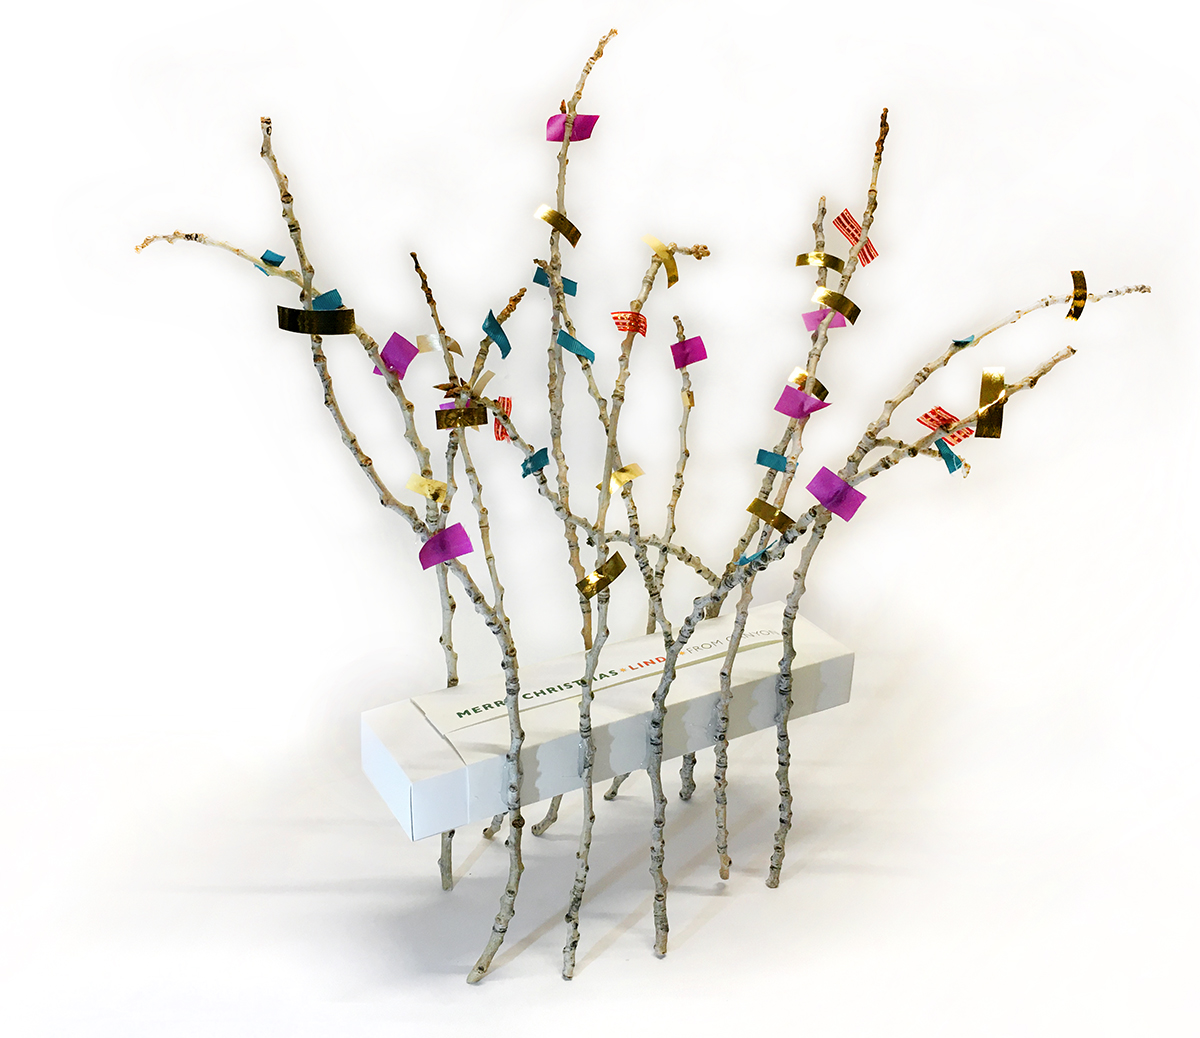
I collected a handful of twigs that had fallen off their trees during a recent icy snowstorm. My intention was to replace two damaged twigs on an old pine-log reindeer christmas sculpture. But two other twigs from our backyard proved better. When it came time for the first wrap of the season, I thought these twigs might make a fine “bow” when bundled together with ribbon and place cross-wise on the long white box of the gift.

But that idea proved wrong in execution. The bundle of twigs never looked elegant. The twigs were awkward with each other. When I paused to ponder new design vectors the twigs piped up with “legs,” a wonderful but often overlooked wrap tactic.

I then made a wrapper for the box, using the white bag in which the gift’s source store had made the delivery to me. The wrapper covered only nlne of the gift’s eleven inches length and used no glue or tape on the gift’s box. That meant that the box could be slid out of the wrapper quickly and effortlessly, with no ripping or tearing.

I divided the sides of the box-and-wrapper into sixths, marking the five spots that separated those sixths. I began hot gluing the legs onto the box. Once they had cooled, I trimmed them to a common length from the bottom of the box. I could then stand up the whole rig, stand back and judge the result.

I felt it could use some color. So I cut up ribbon fragments —purple, teal, red, and gold— to become abstract leaves. I glued them on, examining both sides as I went.

For the label, I made a strip of typography, printed it out, and cut it into a ribbon. I folded the ends and tucked them into the ends of the white wrapper.

Fur Bearing Wrap

A very small package can have lots of impact. I wrapped the gift with foil paper. I cut four legs from my twig stash and glued them directly to the wrap. Next I reached into my odd materials bin and pulled out a scrap of fur that had been waiting for its moment. With a few dabs of glue I had the latest addition to my critter wraps collection.

Corner Construct

I found some industrial molded-paper devices, which were made to protect furniture in shipping, in my alley dumpster a number of years ago. I have saved them faithfully, knowing that their time would come.

I placed the gift into the cavity inside and lightly glued the two halves together. I did this before giving any thought to what would happen next. Using occasional dots of hot glue I attached a bit of red ribbon to cover up the join of the two corners. Then I eyed the half circles along the joint and tried out a number of round things, choosing finally some water bottle caps. They are on both sides. This wrap is the same on both sides.

I already had a box of green packing peanuts lying our for the holiday shipping effort. These green beauties, though fragile, had just the right color. In went 12 peanuts, with a dab of glue. Wrap accomplished. And a wrap with a very different look and feel.